Part 1
요약·해설
공식 배선 사진, 자동 SHIELD 설정과 13개 build·shell block을 보존합니다.
nPM6001
BUCK0-3 · LDO0-1
GPIO · Watchdog
Part 2
접을 수 있는 영어 원문 전체
영어 원문 전체 펼치기
F73D5F153582C724B74A330DFACADF5B2D04499DD7569F2B0BFDE4910FF3EE09
.. _npm6001_ek_sample:

nPM6001 EK sample
#################

Overview
********

This sample is provided as an example to test the :ref:`npm6001_ek`. The sample
provides a shell interface that allows to test multiple functionalities offered
by the nPM6001 PMIC, including:

- Regulators (BUCK0/1/2/3 and LDO0/1)
- GPIO
- Watchdog

Requirements
************

The shield needs to be wired to a host board supporting the Arduino connector.
Below you can find a wiring example for the nRF52840 DK:

.. figure:: ../../../../../../../samples/shields/npm6001_ek/doc/nrf52840dk_wiring.jpg
   :alt: nRF52840DK + nPM6001-EK wiring example
   :align: center

   nRF52840DK + nPM6001-EK wiring example

Building and Running
********************

The sample is designed so that it can run on any platform. For example, when
building for the nRF52840 DK, the following command can be used:

.. zephyr-app-commands::
   :zephyr-app: samples/shields/npm6001_ek
   :board: nrf52840dk/nrf52840
   :goals: build
   :compact:

Note that this sample automatically sets ``SHIELD`` to ``npm6001_ek``. Once
flashed, you should boot into the shell interface. The ``npm6001`` command is
provided to test the PMIC. Below you can find details for each subcommand.

Regulators
==========

The ``npm6001`` shell interface provides the ``regulator`` subcommand to test
the regulators embedded in the PMIC (BUCK0/1/2/3 and LDO0/1). Below you can
find some command examples.

.. code-block:: bash

   # list all the available regulators
   npm6001 regulator list
   BUCK0
   BUCK1
   BUCK2
   BUCK3
   LDO0
   LDO1

.. code-block:: bash

   # list all the supported voltages by BUCK2
   npm6001 regulator voltages BUCK2
   1200 mV
   1250 mV
   1300 mV
   1350 mV
   1400 mV

.. code-block:: bash

   # enable BUCK3
   npm6001 regulator enable BUCK3
   # disable BUCK3
   npm6001 regulator disable BUCK3

.. code-block:: bash

   # set BUCK3 voltage to exactly 3000 mV
   npm6001 regulator set BUCK3 3000
   # obtain the actual BUCK3 configured voltage
   npm6001 regulator get BUCK3
   3000 mV
   # set BUCK0 voltage to a value between 2350 mV and 2450 mV
   npm6001 regulator set BUCK0 2350 2450
   # obtain the actual BUCK0 configured voltage
   npm6001 regulator get BUCK3
   2400 mV

.. code-block:: bash

   # set BUCK0 to hysteretic mode
   npm6001 regulator modeset BUCK0 hys
   # set BUCK0 to PWM mode
   npm6001 regulator modeset BUCK0 pwm

.. code-block:: bash

   # get BUCK0 mode
   npm6001 regulator modeget BUCK0
   Hysteretic

.. code-block:: bash

   # get active errors on BUCK0
   npm6001 regulator errors BUCK0
   Overcurrent:    [ ]
   Overtemp.:      [ ]

GPIO
====

The ``npm6001`` shell interface provides the ``gpio`` subcommand to test the
GPIO functionality offered by the PMIC. Below you can find some command
examples.

.. code-block:: bash

   # configure GPIO 0 as output
   npm6001 gpio configure -p 0 -d out
   # configure GPIO 0 as output (init high)
   npm6001 gpio configure -p 0 -d outh
   # configure GPIO 0 as output (init low)
   npm6001 gpio configure -p 0 -d outl
   # configure GPIO 0 as output with high-drive mode enabled
   npm6001 gpio configure -p 0 -d out --high-drive
   # configure GPIO 1 as input
   npm6001 gpio configure -p 1 -d input
   # configure GPIO 1 as input with pull-down enabled
   npm6001 gpio configure -p 1 -d input --pull-down
   # configure GPIO 1 as input with CMOS mode enabled
   npm6001 gpio configure -p 1 -d input --cmos

.. code-block:: bash

   # get GPIO 1 level
   npm6001 gpio get 1

.. code-block:: bash

   # set GPIO 0 high
   npm6001 gpio set 0 1
   # set GPIO 0 low
   npm6001 gpio set 0 0

.. code-block:: bash

   # toggle GPIO 0
   npm6001 gpio toggle 0

Watchdog
========

The ``npm6001`` shell interface provides the ``wdt`` subcommand to test the
Watchdog functionality offered by the PMIC. Below you can find some command
examples.

.. code-block:: bash

   # enable watchdog, timeout set to 8 seconds. Timeout will be rounded up to
   # the resolution of the watchdog, e.g. 10s -> 12s.
   npm6001 wdt enable 8000
   # disable watchdog
   npm6001 wdt disable
   # kick/feed watchdog
   npm6001 wdt kick

.. note::
   When the watchdog reset pin is connected to your board reset, you will see
   how Zephyr reboots after the watchdog timeout expires.
Part 3
한국어 전문 번역
개요
npm6001_ek를 시험하는 example sample입니다. nPM6001 PMIC가 제공하는 여러 기능을 확인할 수 있도록 npm6001 shell interface를 제공합니다.
- Regulator: BUCK0·BUCK1·BUCK2·BUCK3과 LDO0·LDO1
- GPIO
- Watchdog
요구 사항
Shield를 Arduino connector를 지원하는 host board에 배선해야 합니다. 아래 사진은 nRF52840 DK와 nPM6001-EK를 연결하는 공식 예입니다.
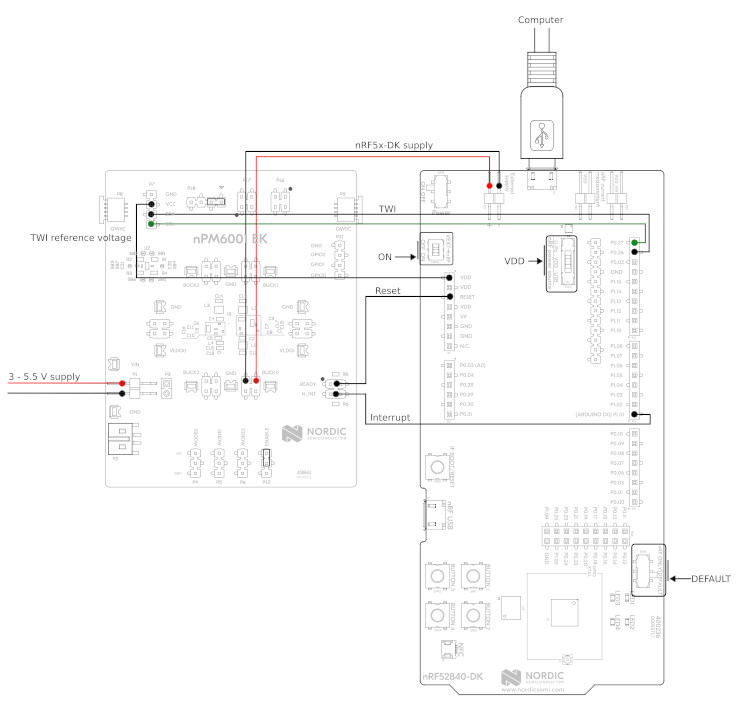
빌드 및 실행
Sample은 어느 platform에서도 실행할 수 있도록 설계되었습니다. 다음은 nRF52840 DK용 build command입니다.
west build -b nrf52840dk/nrf52840 samples/shields/npm6001_ek이 sample은 SHIELD를 npm6001_ek로 자동 설정합니다. Flash한 뒤 shell interface로 boot하면 PMIC 시험용 npm6001 command와 각 subcommand를 사용할 수 있습니다.
Regulator
npm6001 regulator subcommand는 PMIC의 BUCK0~3과 LDO0~1을 시험합니다. 먼저 사용 가능한 regulator를 나열합니다.
# list all the available regulators
npm6001 regulator list
BUCK0
BUCK1
BUCK2
BUCK3
LDO0
LDO1voltages는 특정 rail이 지원하는 discrete voltage를 mV 단위로 표시합니다.
# list all the supported voltages by BUCK2
npm6001 regulator voltages BUCK2
1200 mV
1250 mV
1300 mV
1350 mV
1400 mVenable과 disable은 rail output을 켜고 끕니다.
# enable BUCK3
npm6001 regulator enable BUCK3
# disable BUCK3
npm6001 regulator disable BUCK3set은 하나의 exact voltage 또는 최소·최대 범위를 받고, get은 실제 구성값을 읽습니다.
# set BUCK3 voltage to exactly 3000 mV
npm6001 regulator set BUCK3 3000
# obtain the actual BUCK3 configured voltage
npm6001 regulator get BUCK3
3000 mV
# set BUCK0 voltage to a value between 2350 mV and 2450 mV
npm6001 regulator set BUCK0 2350 2450
# obtain the actual BUCK0 configured voltage
npm6001 regulator get BUCK3
2400 mV
원문 마지막 조회 command는 BUCK0 범위를 설정한 직후에도 get BUCK3로 적혀 있습니다. 원문 보존 원칙에 따라 고치지 않았으므로 실제 시험에서는 조회할 rail 이름이 의도와 맞는지 확인해야 합니다.
modeset으로 BUCK0을 hysteretic mode 또는 PWM mode로 전환하고 modeget으로 현재 mode를 확인합니다.
# set BUCK0 to hysteretic mode
npm6001 regulator modeset BUCK0 hys
# set BUCK0 to PWM mode
npm6001 regulator modeset BUCK0 pwm
# get BUCK0 mode
npm6001 regulator modeget BUCK0
Hystereticerrors는 overcurrent와 overtemperature 같은 active fault를 표시합니다. 빈 대괄호는 해당 error가 active가 아님을 뜻합니다.
# get active errors on BUCK0
npm6001 regulator errors BUCK0
Overcurrent:    [ ]
Overtemp.:      [ ]
GPIO
npm6001 gpio subcommand는 PMIC GPIO를 시험합니다. GPIO 0을 일반 output, initial-high, initial-low 또는 high-drive output으로 만들 수 있고, GPIO 1은 일반 input, pull-down input 또는 CMOS input으로 구성할 수 있습니다.
# configure GPIO 0 as output
npm6001 gpio configure -p 0 -d out
# configure GPIO 0 as output (init high)
npm6001 gpio configure -p 0 -d outh
# configure GPIO 0 as output (init low)
npm6001 gpio configure -p 0 -d outl
# configure GPIO 0 as output with high-drive mode enabled
npm6001 gpio configure -p 0 -d out --high-drive
# configure GPIO 1 as input
npm6001 gpio configure -p 1 -d input
# configure GPIO 1 as input with pull-down enabled
npm6001 gpio configure -p 1 -d input --pull-down
# configure GPIO 1 as input with CMOS mode enabled
npm6001 gpio configure -p 1 -d input --cmosget은 input level을 읽고, set은 output을 1 또는 0으로 설정하며, toggle은 현재 output level을 반전합니다.
# get GPIO 1 level
npm6001 gpio get 1
# set GPIO 0 high
npm6001 gpio set 0 1
# set GPIO 0 low
npm6001 gpio set 0 0# toggle GPIO 0
npm6001 gpio toggle 0Watchdog
npm6001 wdt subcommand로 watchdog을 활성화·비활성화하거나 kick/feed할 수 있습니다. Timeout은 watchdog resolution에 맞춰 위쪽 값으로 반올림되므로, 예를 들어 10초 요청이 12초가 될 수 있습니다.
# enable watchdog, timeout set to 8 seconds. Timeout will be rounded up to
# the resolution of the watchdog, e.g. 10s -> 12s.
npm6001 wdt enable 8000
# disable watchdog
npm6001 wdt disable
# kick/feed watchdog
npm6001 wdt kickSource
출처
영어 원문에는 문단, 문서 지시문, 표, 코드, 코드 심벌, 경로를 그대로 보존했습니다.